DigiStar DVB-S PCI Card Quick install manual - MyGica
DigiStar DVB-S PCI Card Quick install manual - MyGica
DigiStar DVB-S PCI Card Quick install manual - MyGica

Create successful ePaper yourself
Turn your PDF publications into a flip-book with our unique Google optimized e-Paper software.
<strong>DigiStar</strong> <strong>DVB</strong>-S <strong>PCI</strong> <strong>Card</strong> <strong>Quick</strong> <strong>install</strong> <strong>manual</strong><br />
Package content:<br />
1. <strong>DigiStar</strong> <strong>DVB</strong> <strong>PCI</strong> x1<br />
2. Remote Controller x1<br />
3. Remote Receive Cable x1<br />
4. Video Cable x1<br />
5. Install CD x1<br />
6. <strong>Quick</strong> <strong>install</strong>ation Guide x1<br />
7. Low-profile bracket for mini tower x1 (option)<br />
System Requirement:<br />
1GHz for watch TV only<br />
CPU 1.7GHz for Watch TV and Record<br />
250MB HDD for <strong>install</strong>ation<br />
Recommend 3GB for TV Recording<br />
OS Windows XP (Windows 98SE/ME/2000 is not supported)<br />
Audio ON board or <strong>PCI</strong> sound <strong>Card</strong><br />
RAM 256MB<br />
DirectX 9.0 and higher<br />
Ku Band LNB and Dish<br />
A cable which can connect the LNB and <strong>DigiStar</strong><br />
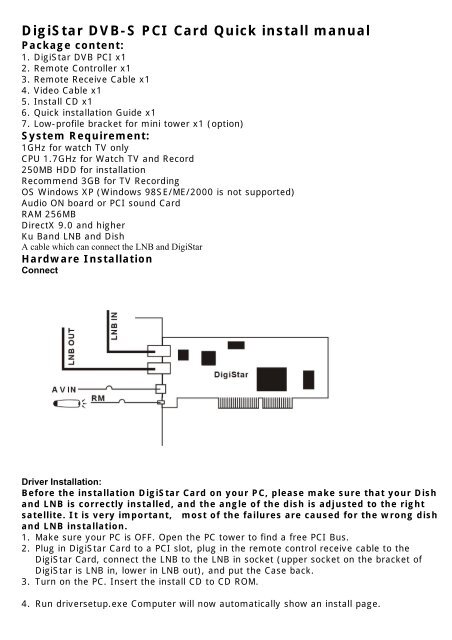
Hardware Installation<br />
Connect<br />
Driver Installation:<br />
Before the <strong>install</strong>ation <strong>DigiStar</strong> <strong>Card</strong> on your PC, please make sure that your Dish<br />
and LNB is correctly <strong>install</strong>ed, and the angle of the dish is adjusted to the right<br />
satellite. It is very important, most of the failures are caused for the wrong dish<br />
and LNB <strong>install</strong>ation.<br />
1. Make sure your PC is OFF. Open the PC tower to find a free <strong>PCI</strong> Bus.<br />
2. Plug in <strong>DigiStar</strong> <strong>Card</strong> to a <strong>PCI</strong> slot, plug in the remote control receive cable to the<br />
<strong>DigiStar</strong> <strong>Card</strong>, connect the LNB to the LNB in socket (upper socket on the bracket of<br />
<strong>DigiStar</strong> is LNB in, lower in LNB out), and put the Case back.<br />
3. Turn on the PC. Insert the <strong>install</strong> CD to CD ROM.<br />
4. Run driversetup.exe Computer will now automatically show an <strong>install</strong> page.
5. Follow the steps to complete the driver <strong>install</strong>ation.<br />
6. You will find 4 new device on the device manager after you <strong>install</strong>ed the driver<br />
properly:<br />
7. Run Setup.exe to <strong>install</strong> the application software.<br />
8. When ask is “<strong>DVB</strong>-S” or “<strong>DVB</strong>-T”, please choose <strong>DVB</strong>-S.<br />
9. When finished, click “Prog<strong>DVB</strong>” Icon on the desktop you can enter the application<br />
software.<br />
<strong>DigiStar</strong> User’s Manual<br />
Prog<strong>DVB</strong> is easy to use and configure. This is a <strong>Quick</strong>-start guide to help you simply receiving satellite TV.<br />
1. Installing Prog<strong>DVB</strong><br />
2. Select the <strong>DVB</strong> card type for Prog<strong>DVB</strong><br />
3. Configuring DiSEqC and LNB settings<br />
4. Scanning satellites<br />
5. Customizing your display settings<br />
6. Fine-tuning Prog<strong>DVB</strong><br />
7. Viewing satellite receptions<br />
8. Additional features<br />
1. Installing Prog<strong>DVB</strong>:<br />
Install the drivers from the CD provided. Then download the latest version of Prog<strong>DVB</strong> from<br />
www.progdvb.com<br />
When executing the <strong>install</strong>er:<br />
1. Choose the right card, <strong>DVB</strong>-S (satellite) or <strong>DVB</strong>-T (Territorial) type.<br />
2. Select the language you want use.<br />
3. Also <strong>install</strong> the DirectX 9.0 if you haven’t <strong>install</strong>ed before in your PC.
Select which option you want to add:<br />
EPG: Electronic program guide<br />
Scheduler: lets you schedule program recording<br />
WinLirc client: add-on letting you use any remote to control your PC functions<br />
(http://winlirc.sourceforge.net/)<br />
Broadcast server: to distribute your feed to other PCs. Only the server PC needs a <strong>DVB</strong> card.<br />
Let the <strong>install</strong>er complete, and then start Prog<strong>DVB</strong>.<br />
2. Select <strong>DVB</strong> card type for Prog<strong>DVB</strong>:<br />
Click on the SETTINGS-> Device List to choose the type of card you have <strong>install</strong>ed to work with Prog<strong>DVB</strong>.<br />
3
From this window, you can see what type of card is configured for Prog<strong>DVB</strong> to use:<br />
3. Configuring DiSEqC and LNB settings:<br />
One of the most important things to define is the DiSEqC switch parameter, whether you connect 1 or more<br />
satellites to your <strong>DVB</strong> card. (More than one satellite feed requires a DiSEqC switch). For each LNB you<br />
must enter the proper settings of LOF1, SWITCH, and LOF2.<br />
If you have only one LNB/antenna to your <strong>DVB</strong> card, select NONE on the DiSEqC box. If you connected<br />
many satellites or LNBs to your <strong>DVB</strong> card, select 1.0 OR 2.0 in the DiSEqC switch boxes.<br />
4
Click a green dot, then select ADD LNB or highlight an already configured LNB, and click PROPERTY on the<br />
right.<br />
In the LNB settings window, select the correct values. Most satellites use the settings as in the following<br />
picture:<br />
For other satellites, such as Nimiq and Echostar satellites, the values are:<br />
Type: Ku or circular<br />
LOF1: 11250<br />
SWITCH : 12700<br />
LOF2: 0<br />
POWER option is when your card powers the LNB. Once done, you are ready to scan your selected satellites.<br />
4. Scanning satellites:<br />
Satellites transmit via many transponders, or emitters. You can scan part of a satellite or all of it.<br />
5
Your scan window for a satellite will look like this:<br />
This is what your SCAN TRANSPONDER should look like:<br />
6
Remember: you need to scan each transponder to find all channels on a satellite.<br />
5. Customizing your display settings:<br />
Select display options for the satellite channels listing by right clicking on the left side of the application.<br />
Important: Only after sorting the channel lists, you can use the IR handset to change the<br />
channel up and down.<br />
7
From this window, choose how you want to display the different aspects of your satellite and its channels.<br />
8
There are 3 types of feeds:<br />
There also data feeds that carry no audio or video.<br />
6. Fine-tuning Prog<strong>DVB</strong>:<br />
Audio and video settings:<br />
From this window (see below), select how Prog<strong>DVB</strong> will output sound and video, DirectShow settings, and<br />
timeshifting values.<br />
7.Viewing satellite reception:
You can view your programs in various ways: regular display, full-screen, or a resizable, moveable window.<br />
In any display mode you are in, right-click your mouse button to select another display mode.<br />
Timeshifting:<br />
This feature lets you record a program. You can pause it, and continue it later: Prog<strong>DVB</strong> will continue to store<br />
the program on hard drive for later viewing.<br />
8
This is the setup screen to adjust Timeshifting parameters:<br />
8. Additional features:<br />
Languages:<br />
Many language translations are available for Prog<strong>DVB</strong>. Please visit<br />
www.progdvb.com for a list of translations.<br />
9
Add-on features to Prog<strong>DVB</strong>:<br />
There are many add-on modules you can <strong>install</strong> in Prog<strong>DVB</strong>: some display subtitles when<br />
available, some others control antenna motors, analyze the <strong>DVB</strong> stream, etc. For more on<br />
these, visit www.progdvb.com.<br />
Scheduler:<br />
Here is the sample schedule from Prog<strong>DVB</strong>. Look at the listings and commands to customize your own<br />
version.<br />
Satellite TV cards let you do many things you cannot do with a regular Free to Air receiver; record<br />
shows and burn them to DVD or CD, simply. Schedule and record, and get satellite TV software such<br />
as Prog<strong>DVB</strong> to enhance your experience.<br />
<strong>DVB</strong> cards let you receive satellite TV and digital TV in a way you never could! A single <strong>DVB</strong> <strong>PCI</strong> card<br />
on your PC can offer more features than a Personal Video Recorder (PVR) like Tivo or DishPlayer,<br />
scheduling and recording of satellite TV and digital TV shows in digital quality.<br />
10
Access to almost all Free-to-Air satellite TV feeds in digital quality with a <strong>DVB</strong> <strong>PCI</strong> card that connects to your<br />
big screen TV and the digital coax cable connection on your sound system to receive AC3 Dolby Surround<br />
Sound.<br />
Satellite TV is moving to the desktop, and offering you features that can only be found on expensive satellite<br />
receivers.