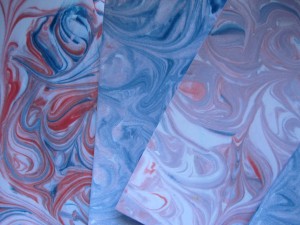
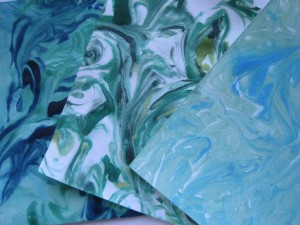
This is a fun and easy crafting project that results in beautiful marbleized paper. You start with shaving cream, dot on some ink, swirl it around, smoosh paper into it, then squeegee the shaving cream off the paper and that’s it! You never know exactly what you will get until you scrape off the layer of shaving cream but the results are usually delightful. Clean up is super easy which is another plus.
I crafted with my friend Margaret today and we were having so much fun that we didn’t want to stop. Playing with the lemon lime scented foam and the beautiful colored ink was both relaxing and satisfying.
Update: For a look at marbleizing using gouache and acrylics, check out the blog by Wayside Artist where she experiments by replacing the ink with thinned down gouache and acrylic paint.
Marbleized Paper with Shaving Cream
Supplies:
Rimmed Baking Sheet for your work surface
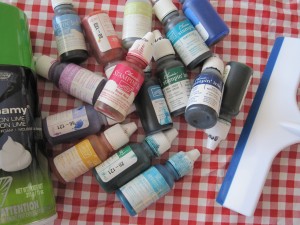
Shaving Cream (not the gel type – and I prefer the lemon lime scent)
Reinkers in several colors (small bottles of ink used to re-ink stamp pads – mine are from Stampin’ Up! and are water-based dye inks, but I’ve read that alcohol-based inks also work)
-OR-
Food Coloring
Plastic Spoon for smoothing out the shaving cream
Chopstick or popsicle stick to swirl ink in shaving cream
Squeegee, plastic scraper or rubber spatula to scrape shaving cream off paper
Paper Towels
White Card Stock or White Printer Paper – cut to size for your projects – 8 1/2 x 11 cut into quarters is usually a good size for greeting cards, but some projects will need a larger size sheet.
Directions:
The baking sheet is your work surface. One one half you will have the shaving cream and on the other a relatively clean surface to squeegee the shaving cream off the paper.
Spray some shaving cream onto one half of the baking sheet and smooth it out into a rough rectangle a little larger than the size of paper you will be coloring. Smooth it out with a plastic spoon and drip some ink onto it.
Now use a chopstick to swirl the ink around. You don’t want to mix it completely, but just swirl the ink lightly into the surface of the shaving cream.
Once all the ink spots have been swirled around, lay a piece of white paper on top of the shaving cream and tap it into the surface so the paper is fully in contact with the shaving cream.
Lift it off and lay the paper face up on the clean side of your baking sheet.
Using a squeegee or other scraper, gently scrape the shaving cream off the paper, revealing the beautiful marbleized design.
A quick wipe with paper towel will get any excess shaving cream. Set paper aside to dry.
The colored shaving cream can be re-used, often without adding more ink. Just swirl the chopstick around through the inky shaving cream and if desired add a few more drops of color and swirl again.
I find it best to stick with two or three colors in adjacent shades. As you mix more ink into the shaving foam your base or background color will be a light version of the original colors which can be even more stunning. If your colors are too far apart on the color wheel, your shaving cream can become muddy-looking pretty fast.
I also tried this method with food coloring.
The colors aren’t the same as the ink refills, but it still produced nice results and folks are more likely to have it in their kitchen.
When you’ve got swirled ink covering all your white paper or your shaving cream has become loaded with so much color that you want to start fresh, it is quite easy to wash the inky shaving cream down the drain, rinse off your utensils and start again.
You’ll end up with inky fingers and a bunch of beautiful paper that you can now use to cover little notebooks, line envelopes and make cards, like this!
Try it out! Thanks for the visit. And thank you, Margaret, for being being a willing hand model and great crafting partner today.


W O W!!!
Loved it!!!
I am doing this activity this weekend with my friend.. 🙂
GREAT post!!!!
Let me know how it goes – I love the results!
Dianne-
This is so cool! I’m another one who can’t wait to try it. I wonder if using thinned out acrylic paints would work too? Let me start with your basic lesson first!
Since subbing to your blog, my “I gotta do this” list is growing very long.
Thanks!
Nanina
So what are you going to do first? I saw other sites online that mentioned doing with tempera paints but I don’t have any paint and have only done the method I describe.
I have some time this Friday to play and am thinking of using acrylics. They’re handy; I would have to buy ink. Will post back how it works.
If you use acrylics, you will probably have to thin them a bit. Here is a link to another site that used acrylics with a different method: http://glpsews.blogspot.com/2008/11/marblized-paper.html
Her results are really stunning and it looks like she was able to control it more than I could with the shaving cream. Another option is food coloring which is more easily obtained than the ink and doesn’t have to be ordered. Keep me posted!
Next time you have a go – try putting another piece of paper on top of the just marbled one before scraping off the foam. That way you get two for the price of one!
I did that but found it was more smeary than I like. I think because the shaving cream coats it with a layer of foam – obscuring the colors. And the ink dries pretty quickly. If you were doing using another medium (oil-based paint floated on water, for example) you could probably do it very effectively. I haven’t tried that method but I’ve seen it in other blogs.
I love this idea for journal covers and end-papers. I have a lot of fountain pen ink, have to give it a try.
Hey, Bill – These would be beautiful end-papers and journal covers and I bet it would work with fountain pen ink! Please send an update if you try it.
Loved doing this with you, Dianne! The shaving cream felt dreamy and the results were great.
I’m going to do it again on lunch break at work. It was fun and I still have plenty of supplies so we’re going to enjoy a creative break in our work day.
I love this! what a great project!
Thanks! I crafted on my lunch break with several colleagues (and the daughter of a colleague) today and everyone had fun.
Hi Dianne!
I tried marbleizing today using gouache and acrylic paint. I wasn’t too successful, but not because those media can’t be used. I didn’t press hard enough to transfer the pattern to my papers. As I went on I got the hang of it, but ran out of playtime. If you like check out the photos here: http://waysideartist.posterous.com/61156608#
This is my first post on Posterous, so I was more than a little lost. I didn’t get the link back to you quite right. Anyway it doesn’t look right. And no spell checker!!! Ack!
Thanks for the fun afternoon break!
Nanina
Thanks, Nanina – Great first post and I appreciate all the nice press. Thank you. I’ve updated my post to include the link back to your post so others can see your photos and tips on your experiments. I love the patterns!
Pingback: Happy Blog-Anniversary to Me! | dianne faw
I want to try this! They’d make great note cards. 🙂
They would for sure. It is LOADS of fun and beautiful too. Look for citrus shaving foam if you can.
This was a very fun project – especially since I was able to do it alongside the blogger herself! I used little strips of my marbleized paper to help decorate some family greeting cards, which I sewed on with shiny thread.
-Monica
Reblogged this on Cobwebs and Cubbyholes and commented:
This looks like great fun. I really think I have to try this out.
Thanks for reblogging. It is really a fun project. Thanks for your comment.
Pingback: Day 28: Collaborate! Marbleized Paper Covered Notebook (with Video!) | dianne faw
I did this project with adults and children in arts and crafts during a Christmas program. We used liquid watercolors and it works beautifully. I learned how to do it at a VBS in southern CA last summer. An all-around favorite activity! Sorry I’m late to leave a comment (by four years!) but just wanted to thank you and weigh in. 😉
Thanks, Christie, for commenting! That is one of my favorite things about having a blog: the projects are up for anyone to find, whenever they want. So it isn’t late at all.. I’m delighted to know that it works well with liquid watercolors. It’s always a fun craft with beautiful results.
Pingback: 低コストのアイテムをペイントして、クリスマスを演出してみませんか?